Have an event and you want collect registrations online? No problem, DojoExpert can help you! Here's how it works:
1) You create an event in DojoExpert manager - you can specify:
- event name
- date of the event and duration
- registration limits (time and number of registrants)
- event description (HTML editor)
- event fee if you want (registrants pay via PayPal)
- fields for registration form (fully customizable)
2) After you create the event you will get an event registration link that you can send via email to invite people to register, or you can embed the registration form directly on your website.
3) People can register via the registration link or emmbeded form. You can limit the registration only on your school members (they need to login with their UID and password).
4) You can track registrants in DojoExpert manager, print them or export to excel. You can send email to all people that registered, and you can even save attendance data for your event - manually or with QR codes (your school members can use their existing QR code cards to check in, and for non-members you can print special QR codes cards to use only for this particular event).
5) If you want, you can collect event fee via PayPal and create invoices automatically.
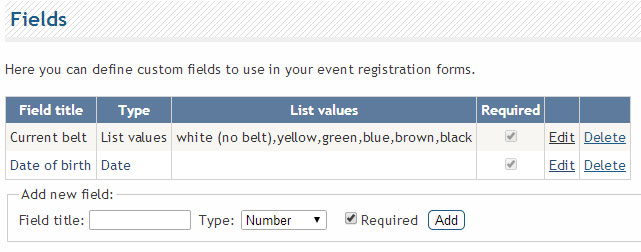
Now that you know what can be done, let's dive into more detail on how to do it. Let's say you are organizing a karate seminar with sensei Wu. The seminar will be free, and everybody is welcome. Login to DojoExpert manager and click "Registrations" in main menu. Add a new event with title "Seminar with sensei Wu". Now, before editing the event we will add two special fields that we will need in the registration form. On the left side click "Custom fields" and add "Current belt" of list type and "Date of birth" of type "date":

Now we are ready to add them to our event and edit other information. We have done it like this:

As you can see, you can format the description of the event with our rich text editor, and add images to! Note the fields section on the bottom - there are 3 fields that are required for any event: first name, last name and email. If you require more data about your registrants, then use custom fields like we did in this example for current belt and date of birth. On the bottom of this form there is a URL and HTML code for embeding this on your website. Let's click the URL and see how this event registration form looks like:

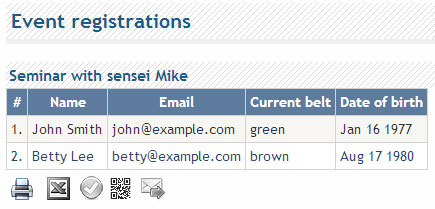
You can send this URL link via email to invite people to register. This is what they will see: event title, place and date, description and form with fields that you specified (3 required and 2 custom in this case). People register by filling this form and hitting "register" button. In DojoExpert manager you can see how many people registered for your event. For our example we have registered 2 people, John and Betty. Go back to "registrations" and click the number under "registrants" column to see it:

And the list appears:

You can see that the table has columns with fields that you have specified (current belt and date of birth). You can ofcourse edit this data by clicking on the row. Under the table there are option icons, you can:
- print the list
- export to excel
- save attendance data
- print QR codes for non members
- send email to all on the list
Let's try to mark attendance by clicking the third icon. You will get familiar interface where you can mark attendance for this event:

If this was an event that last more then 1 day, then you would be able to select for which day you want to mark attendance. But, you can also mark attendance with QR codes! Your existing members can use their existing QR code cards, and for those that are not your members, you can print the cards your self by clicking the QR code icon. Or, you can send the QR codes to your registrants via email in this way:
1) click email icon:

You will be redirected to familiar e-mail interface with preselected recipients:

2) Write your email text and include a link to this Google app for rendering QR code with last parameter "chl" set to UID like this:
http://chart.googleapis.com/chart?chs=150x150&cht=qr&choe=UTF-8&chl={UID}
The {UID} will be replaced with actual ID of particular registrant. When he receives the email and clicks on the link he will be redirected to a page with QR code which can be printed.
Implementing paid events
If your event requires payment, you can collect registration and payments online trough PayPal or Stripe. This is only available if you have our PRO account. And, if you use our PayPal or Stripe integration for automatic payment processing you can create invoice for each payment that is made for that event. All that you need to do is set the fee and specify your PayPal email address (or Stripe) where you want to receive the payments. Users will then after registration be redirected to PayPal or Stripe form to pay the fee you specified. Be aware that the currency is the one you have set in settings.
Hope you like our event registration system - of course there is room for improvements, and we will improve it over time according to your suggestions! Contact us via email if you require help or have a suggestion!
More features in registration forms
There are also these cool features for event registration forms:
- send e-mail notification to users after registering
- receive e-mail notification when a user registers
- hide/display event header (title, place, time)
- discount codes (coupons) for paid events
- full fields mapping for converting non-members to members
- Let’s examine in more details these new features.
Sending e-mail notifications
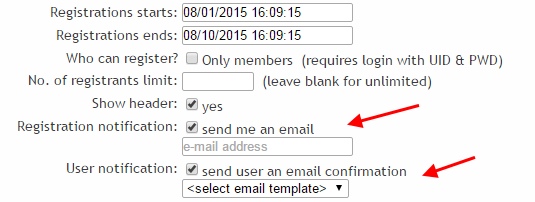
In event setting you can specify if you want to receive email notification when someone registers, and/or you can specify if you want to send an email to a user after he registers. In order to receive email notification, you simply need to enable this check box and specify your email:

To send email notification to user, you need to create an email template and select it (“user notification” check box). To create the email template follow these steps:
- select “email” in main menu
- write email body and subject
- under email body find “save as new template” box, enter template name and click the “save” button
Here’s an example:

As you can see in above example you can use codes {fname} and {lname} to replace first and last names of users (and other codes like {customX} for custom fields). After you save the template you can select it in registration edit.
Hiding event header
Sometimes you do not want to display the default event header in registration forms. Use this check box to control whether you want it to be shown or hidden:

Discount codes
If you want to enable discounts for your paid events, you can easily create coupon codes! Go to “registrations” and select “discount” on the left menu.
You can specify discount rate or discount amount.
These codes will be available for selection in your event settings.
If you have selected at least one code a new field will be added to registration form where users can enter the code and check it if valid.
If the code is correct, a discount will be applied to the amount (registration fee). The discount amount will be visible in invoice and in PayPal form.
Fields mapping
When you’re creating custom fields which you want to use in your registration forms, you can map them to the existing database and custom fields which are used to store member details. These mappings are useful if you want use the most of “convert to member” command that is available for your registrants. Until now only first name, last name and email could be converted, but now with mappings all fields that you use in your registration forms can be transferred to members database if you specify field mappings. This is useful if you want to create registration forms for joining your school or forms to collect leads. You can find “mapping” options when you edit or add “custom fields” for registrations.