Welcome to DojoExpert! Through this guide you will learn some basic steps on how to manage your school with the help of DojoExpert. After you read this short guide you will be able to:
- add members
- create classes
- track attendance
- create invoices and mark payments
Let’s start!
Adding members
To add members to your database you need to go to “members” page of course 🙂 First name, last name and dojo are required fields when adding new members:

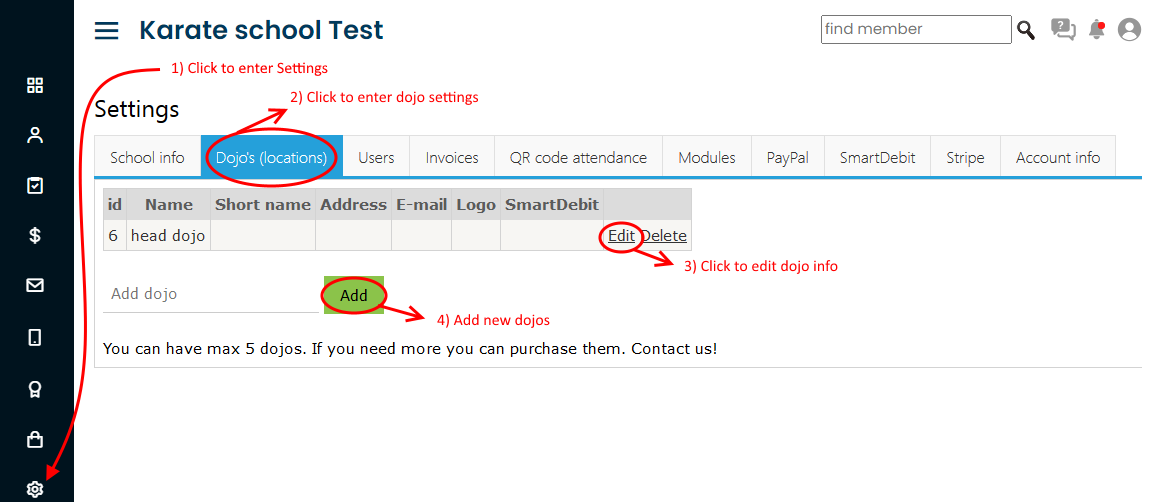
“Dojo” can be a location or a school branch. If you don’t have multiple branches, then put all your members in default “head dojo”. If you want you can change dojos (like update its name, add new ones, maybe delete existing etc.) you can do it in settings:
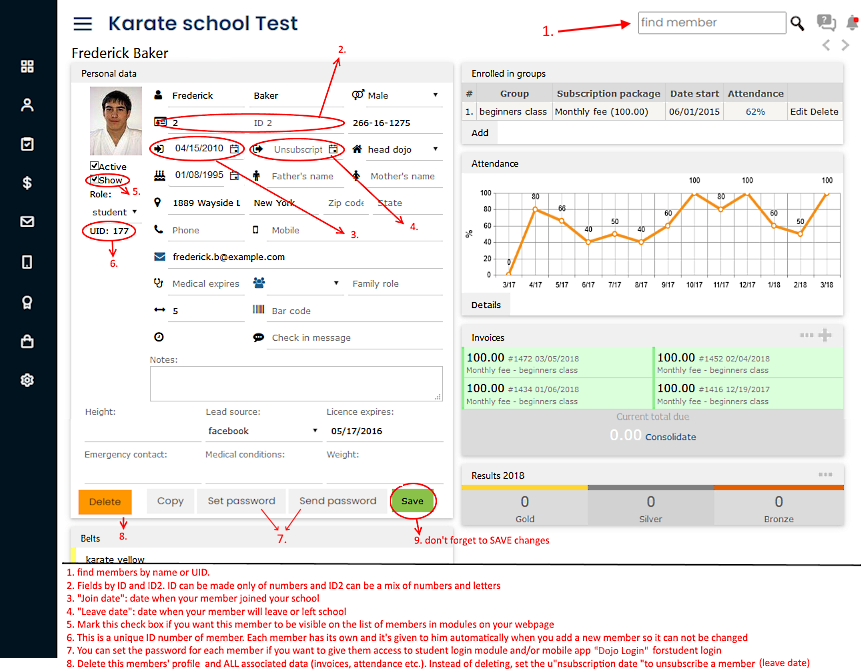
Back to members management. When you add new member, you will be redirected to member’s profile page where you can fill other data (if you want). All fields are optional, you don’t need to fill them if you don’t need them. After any changes, click “save” button. Some of important points on a member’s profile are marked on this screenshot:
If you have a lot of members in excel or csv file you can send the file to us and we can do the import for you.
Classes
After you add a few members you can define classes and enroll them. In main menu select "Classes" - "Classes". Classes are defined per dojo, so first you need select the dojo in which you want to add class (if you have more than one dojo). Name your Class as you wish, e.g. “beginners class”.
For each class you can define class schedule (if you want, this is not required) - then the class will be visible in your Scheduler.
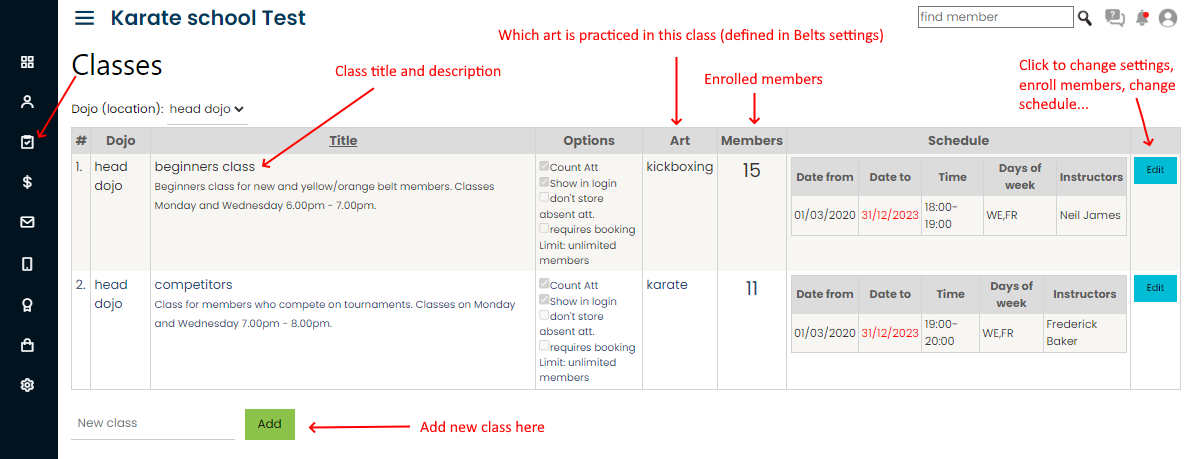
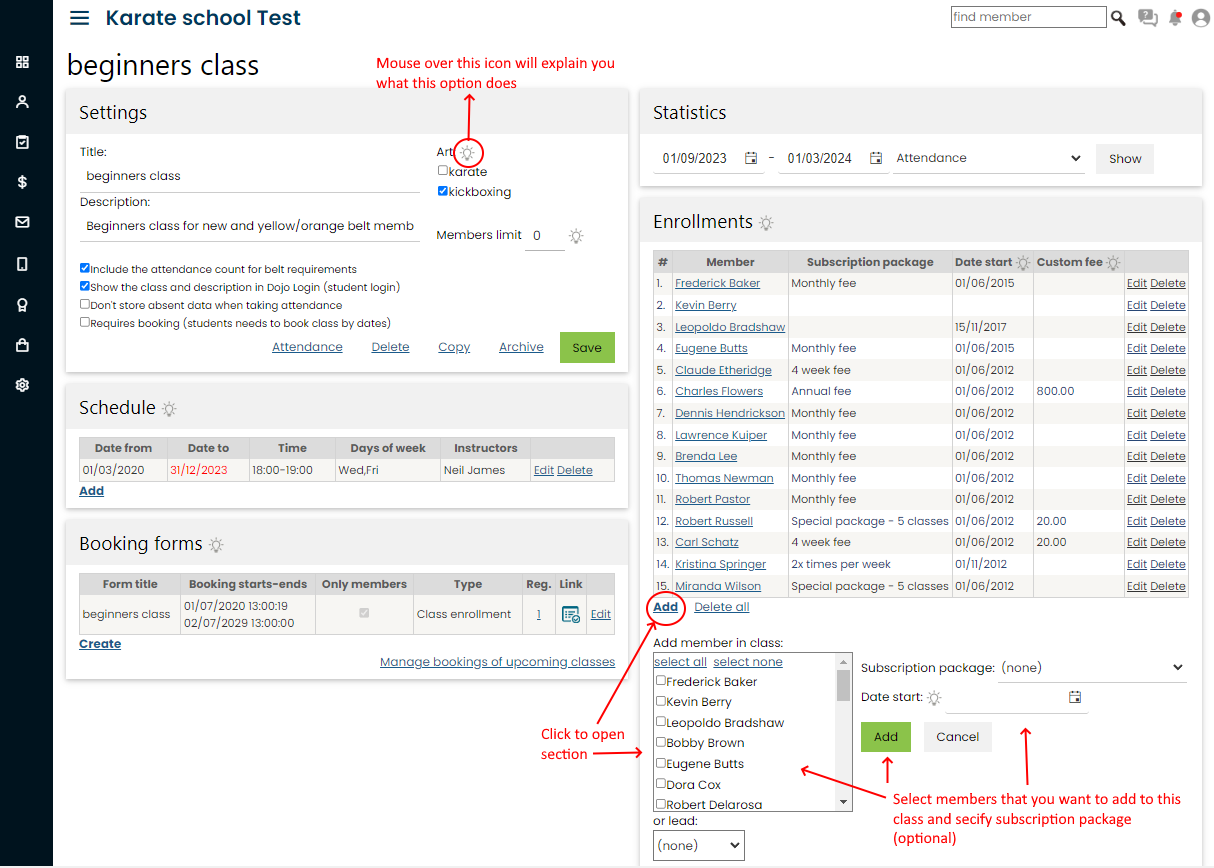
After you have created classes you can add (enroll) members in. You can do this here on this screen, or in member’s profile screen.
One member can be enrolled in multiple classes if you want. When enrolling a member you can specify the subscription package and start date:
You will learn more on subscription packages and how they work below, under invoices.
Classes can be booked trough booking forms that you can create and embed in your website. If you want to use that feature and enable your students to book classes
or enroll them self, read our Class booking tutorial.
Another similar concept to Classes are "Groups". You can find them under "Members" main menu. Groups work similar to classes - you create them and you can enroll members in. The
difference is that for groups you can't track attendance or do bookings. So, groups are used for any other grouping that you need, for example, group of members that
are on special payment plan, or group of members that will go to summar camp, etc.
Attendance tracking
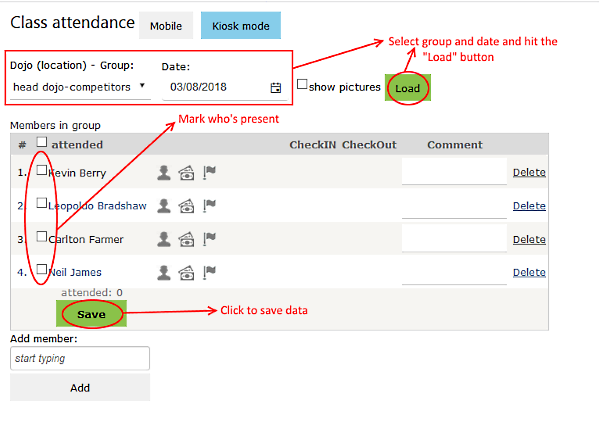
After you have added members and enrolled them into classes, you are ready to try attendance tracking. Let’s start with the simple manual attendance. In main menu select “Classes” and then “Attendance”. Select class and date for which you want to mark attendance. You can select any date – there are no restrictions – even if you specified classes in “scheduler” you can select date and mark attendance for any day.
So, select class, select date, and hit “load” button to load the list of members that are enrolled into selected class. Here you can mark who is present on the class (you can do this on your tablet or mobile phone when class starts or ends, or later anytime):
There are a lot of other options on this screen, but we will skip them as this is just a “quick start” guide, right?
If you want to track attendance with QR code cards you first need to print them. Select “Members” from main menu and then “Cards”. Create a new card layout by giving card title and then click "open designer" when it appears in grid.
Be aware that your browser may block the popup window, so make sure to enable popups in your browser when asked.
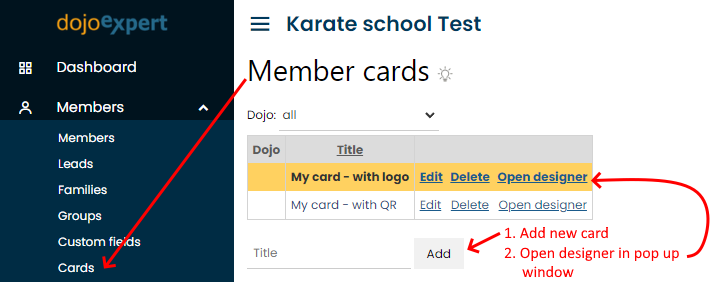
Card designer will open and you can design your card by drag-and-drop of fileds to card. To have card with two faces (front and back) create two cards, one for front and one for back layout.
Check out this Tutorial for usinig and printing member cards
After you print your card you are ready for attendance tracking test. Download and install the tracking app on your phone or tablet. Links are:
For Android: https://play.google.com/store/apps/details?id=com.dojoexpert.dojoexpert
For iOS (iPhone/iPad): https://itunes.apple.com/us/app/dojoexpert/id1401001113
Open the app and login with your DojoExpert username and password. On main menu select “attendance”, select a group (like in manual att. tracking) and then select “scan QR” button. If you see “Ready to scan” on your screen, you can try to scan one of the QR code cards you’ve just printed. After successful scanning of e.g. John Smith’s card you will see the “Welcome John Smith” message and you can immediately check in DojoExpert manager if the attendance is marked (go to manual attendance tracking screen like described above).
If the test was successful you can print all the cards and distribute them to your members. Put your tablet or phone on the table and instruct your students to scan the cards on beginning of the class. A good idea is to keep copies of cards in your school in case someone forgets the card – he can use the copy to check in.
Members can also access their digital version of QR card inside mobile app "Dojo Login" - mobile app for students.
If all your students have this app then printing QR codes is not required, they can access it within the app.
If something went wrong or you just have more questions about the attendance tracking, post a ticket (click “help” icon in DojoExpert manager).
Invoices and payments
OK, now the tricky part 🙂 No fear, everything will be explained with an example. Let’s say your members pays you a monthly fee for training in your school. And you want them to pay you on the beginning of the month, and if someone is late, you want to warn them on the check in (when they scan the QR card). There are a lot of other payment options that you can set, but we will stick with this basic example. For more detailed instructions read our invoicing tutorial.
Back to example. First you need to create a subscription package. Go to “finances” in main menu and select “subscription packages”. Add a new subscription package with settings as on this screenshot (red rectangle):
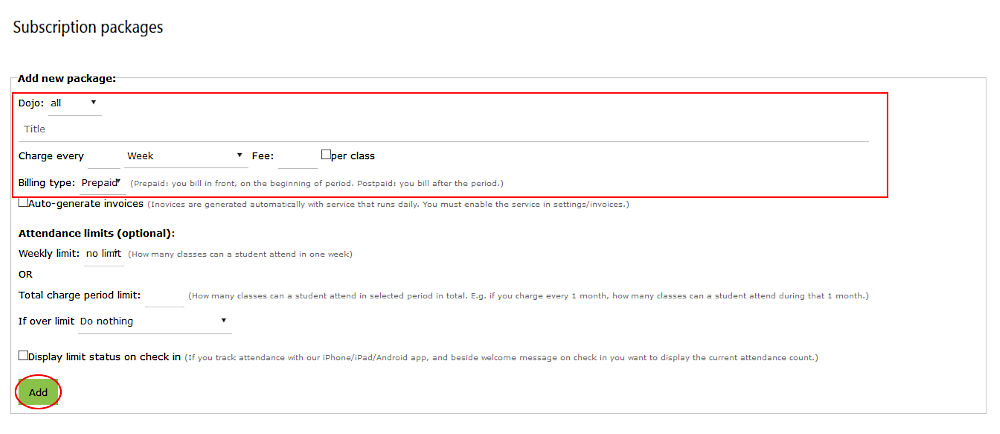
In this example we named our package as “monthly fee” and set the fee to $100. Now that we have a package we need to tell the system who will use it (you can have multiple packages and one members can use more then one package). You can assign a package to members in members profile or in groups screen (like mentioned above when we talked about groups). Let’s do this in members profile. Find a member (e.g. John Smith) and edit the group enrollment on the right to assign this package (click “edit” link in groups grid to enter the edit mode):

You need to do thisalso for all other members. To do it more quickly, first create subscription package and then do the group enrollment in groups screen. There you can use “select all” options and enroll multiple members with same package at once.
Now we are ready to create invoices. Go to “finance” and then “invoices” in the main menu. Click “generate subscription invoices” button. Since we used “monthly fee” and we want to generate invoices for monthly fee we need to set the dates to be one month apart. Also, the first date must be equal or later than the “start date” which we specified for members when we assigned the subscription package:

The invoice date can be any date. Click “generate invoices” and invoices will appear. Note that if you set a future invoice date, you need to adjust the grid period filter to see the invoices:

Now, after your member scans the QR code card on your device, if the due exists (unpaid invoices), its amount will be shown on screen. You can disable this in settings if you don’t want it to be displayed.
When a member pays you, you need to “close” the invoice; in other word, you need to enter the payment in appropriate invoice. You can do this in several places, but the most straightforward way is through “add payment” screen. You can find it under “Finance” in main menu.
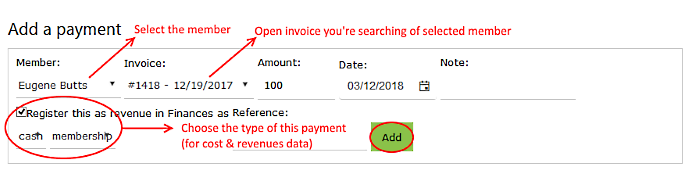
After you select a member the “invoices” will drop down. The system auto-populates with open invoices and selects first open invoice (if there is more than one) and also fills the amount automatically. You can change all these default values if you want. You can also get to this screen from attendance screen (to easily add payments when someone pays you during class):
Student login
If your DojoExpert account is in PRO or ULTIMATE plan then your students can use student login apps. Student login, or members area, can be embeded
into your website or your students can use mobile app Dojo Login (Android and iOS). Read here about Student login apps.
To enable your students to login you must give them their UID - which is found in members profile under the picture. And you need to give them
password - which is generated by the system (random string) and sent to their email. Find "send password" button in members profile (member needs
to have email entered).
There is another much convenient way to send your members UID, password and login instructions (links to Dojo Login app or your website where
student login widget is embeded) - by using email. In main menu select "messaging", then "email", then "send email". There you can select all your members
(click "add" button to add them to recipients list) and write email message with {uid} and {pwd} codes, which on send will be replaced by actual values
for each member. For example you could write something like:
Dear {fname},
You can login into members area on this link .... or download DojoLogin app on your mobile phone via these links: ...
Your login credentials are:
UID: {uid}
Password: {pwd}
Best regards
Your Sensei
How to contact us for help
Hope you’ve enjoyed our quick start guide! This is only a short introduction – with DojoExpert you can do much more! If you need help we encourage you to use our ticketing system – click “Help” icon in your account and add new ticket. We will try to answer you ASAP 😉