This tutorial introduces the DojoExpert class booking feature, which lets you:
- Create online class booking forms
- Share booking forms by email or through the Dojo Login student app
- Set class booking limits (max. number of students per class)
- Set payment options
- Track class bookings, add and cancel bookings
You need a DojoExpert PRO or ULTIMATE account to use class booking.
How does it work?
First, create classes and schedules in your DojoExpert account, then create a booking form for the selected classes. Students can access the form through the Dojo Login app or a unique link you share by email. You can also embed the form on your website. Students use the form to book, and you can view their bookings in DojoExpert.
Two types of class bookings
To track attendance, members must be enrolled in a class. Previously, a coach or administrator enrolled members through the DojoExpert web or mobile app. With class booking forms, existing and prospective members can enroll themselves. There are two types of forms: class enrollment forms and forms for booking a class on a specific date. The second type requires a class schedule. The requirements are:
- Class enrolment form - any class can use this type of form
- Class and date booking form - the class must have "required booking" enabled and a schedule configured
Set "required booking" and the class schedule on the "Classes" page:
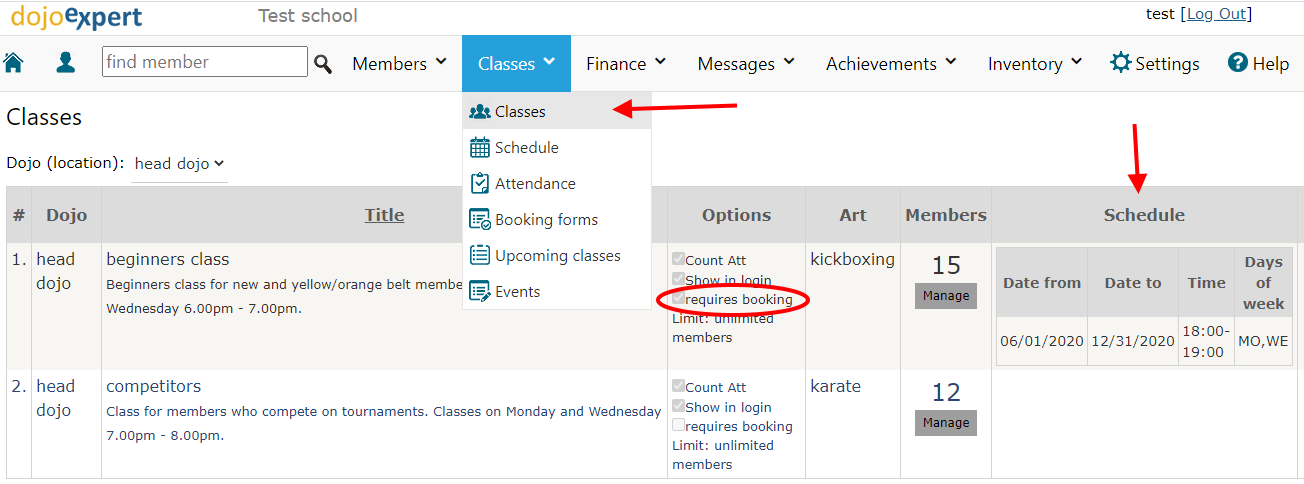
We will focus on "class and date booking" forms in this tutorial.
Class schedule
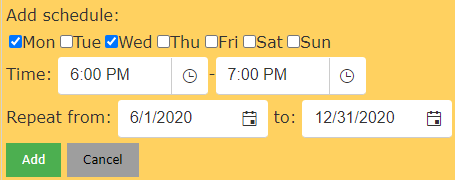
To accept bookings for specific class dates, you need a class schedule. Edit the class on the "Classes" page, as shown in the previous screenshot. Specify the days of the week and the date range over which the weekly schedule repeats:
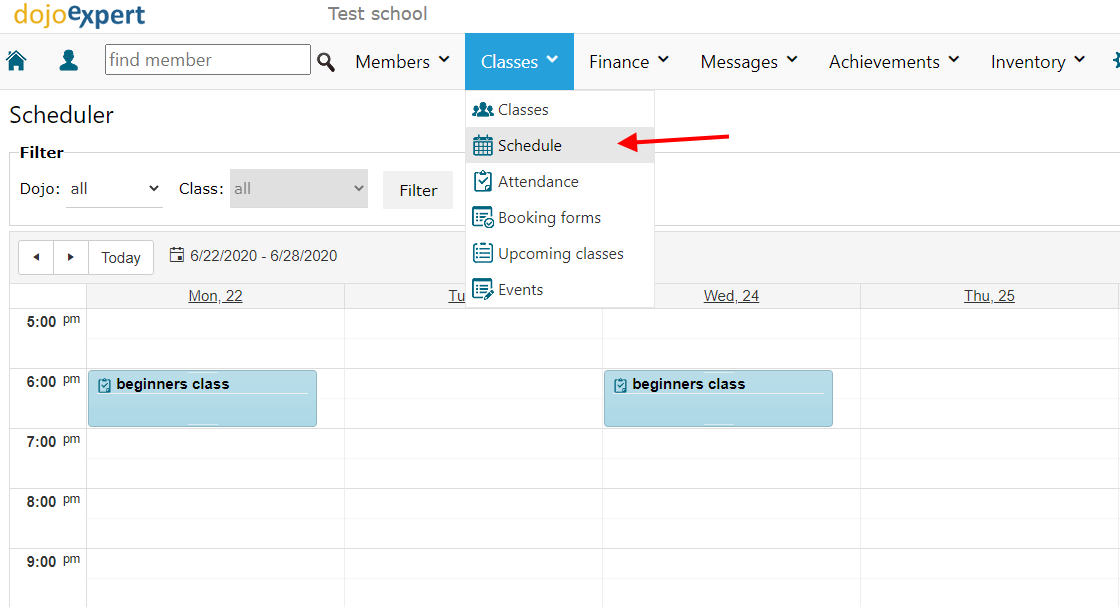
The schedule appears in the DojoExpert scheduler. To cancel or reschedule an individual class occurrence, delete or move it in the scheduler:
Class booking form
Create at least one booking form for any class with "requires booking" enabled. You can create one with a single click on the classes page:

Once the form is created, three icons appear in this column:
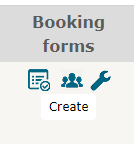
The first icon opens the booking form you can share with students. The second opens the list of students who booked through the form, and the third opens form settings. Forms are restricted to members by default. You can make a form public, but anyone who books through it will be added to your member database.
For a members-only form, students log in with their UID and password. They then see a calendar with available booking dates in green:
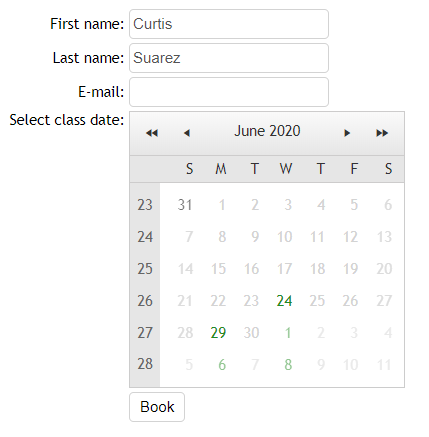
Name and email are required fields. You can add more fields to the form in form settings, explained below.
Booking list
After sharing the form link, you can monitor bookings in several places. For example, click the registrant list icon on the classes page:
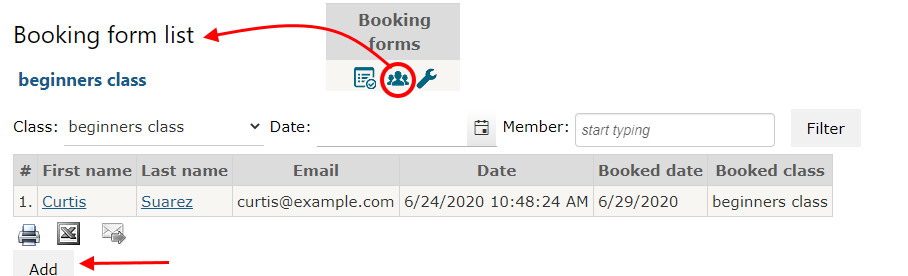
Click "Add" to add a booking manually.
You can also track bookings on the "Upcoming classes" list:
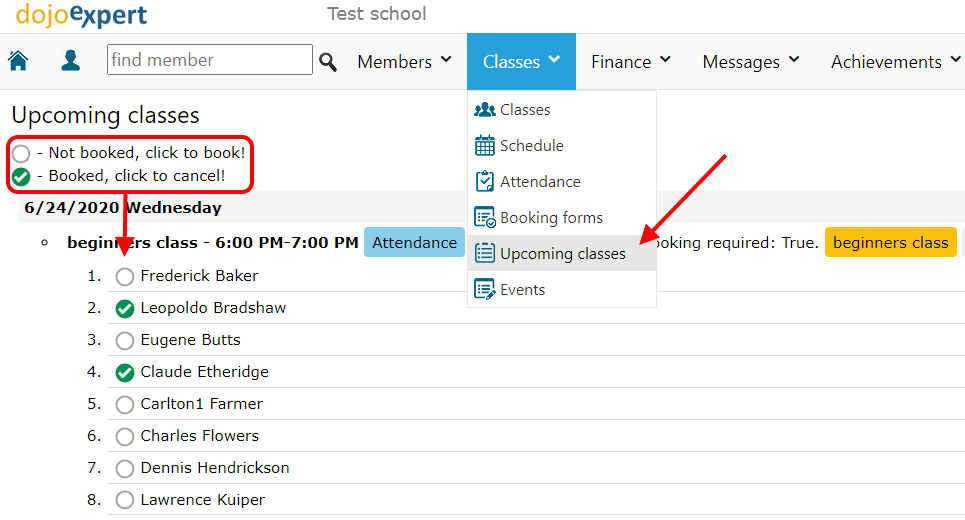
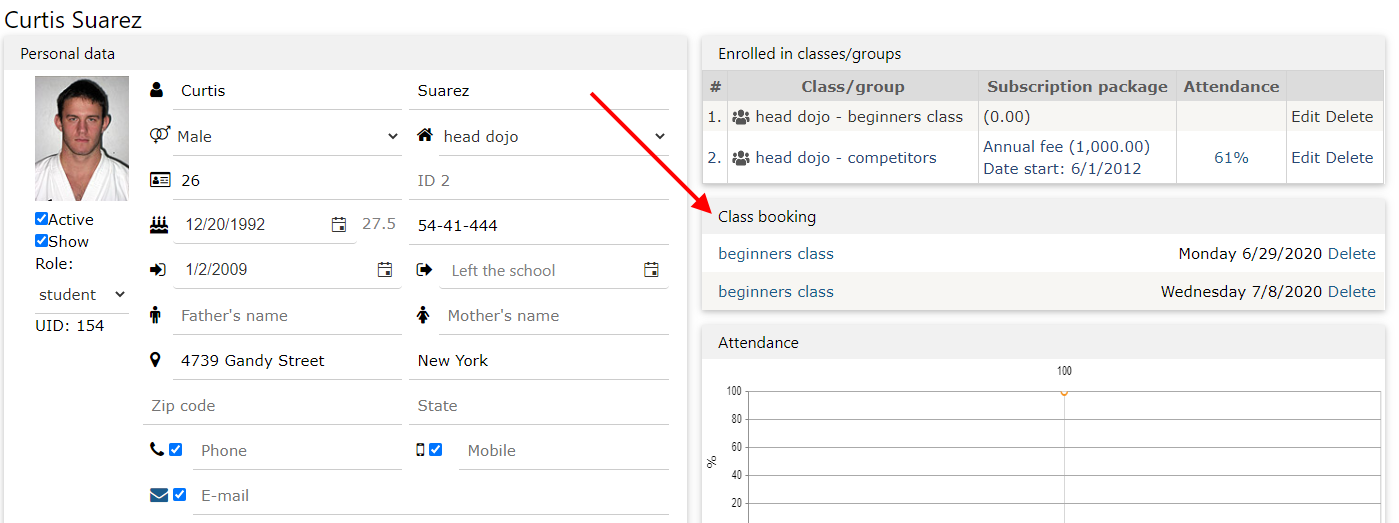
This page lists scheduled classes for the next 7 days. For classes that require booking, a circle icon appears next to each enrolled member. Click it to add or remove a booking without using the booking form. You can also view bookings in a member's profile:
Attendance tracking for booked classes
For classes that do not require booking, the attendance list shows all enrolled members. For classes that require booking, it shows only members who are enrolled and have booked the selected date. If nobody has booked, the list will be empty even if members are enrolled. To save attendance, someone must book, or you can manually add members to the list.
Class limits
Set a class limit to control how many people can book. Edit the class on the classes page:

When the limit is reached, the date turns red on the booking calendar and can no longer be selected. The "Upcoming classes" list also shows that the class is full.
Booking through the student app and cancellation options
New booking forms are hidden in the Dojo Login app by default. In form settings, make the form visible and set the cancellation deadline: how many hours before the class starts students must cancel their booking.
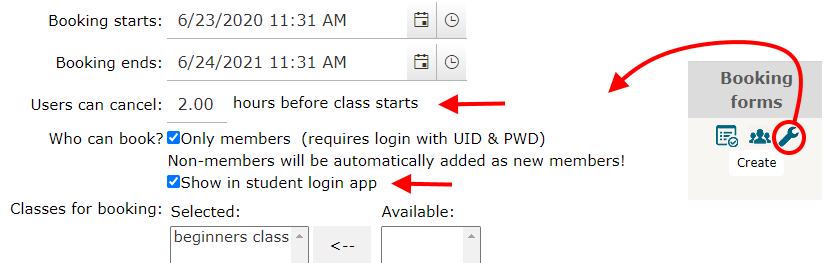
This makes the form visible, but students cannot see their bookings if the class is hidden. Go to "Classes" and enable "show in login" in the "options" column; it is disabled by default. Finally, check that the "Classes" menu is visible in Dojo Login. Find this setting under "Messages" - "Dojo Login" - "App info".
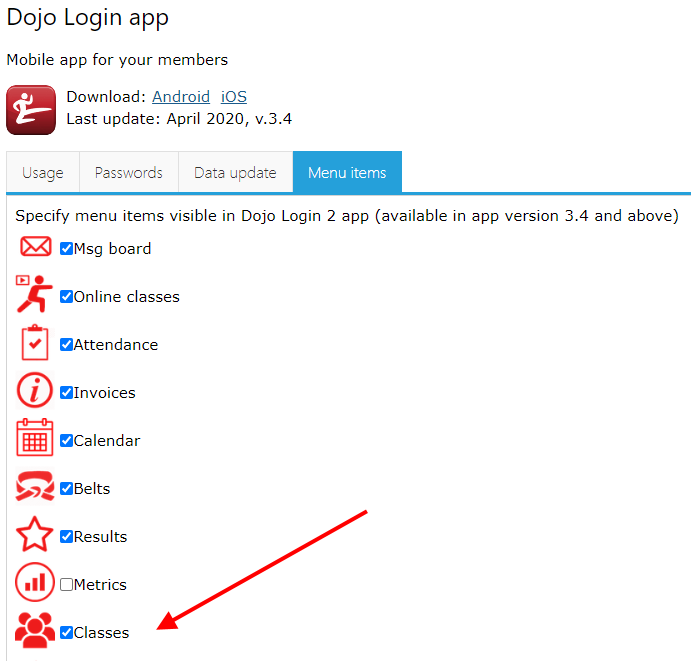
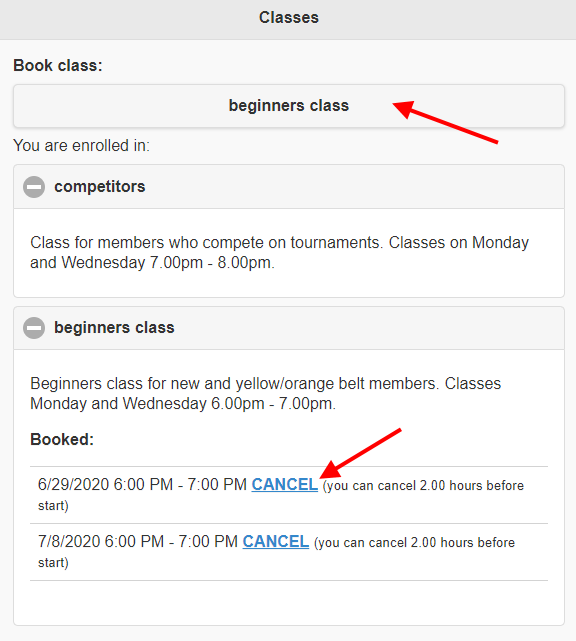
When all three visibility settings are enabled, students can manage bookings in the Dojo Login web and mobile apps:
Mobile app support
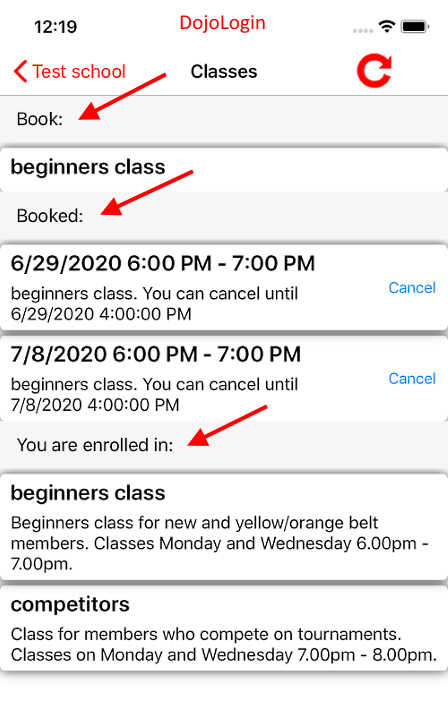
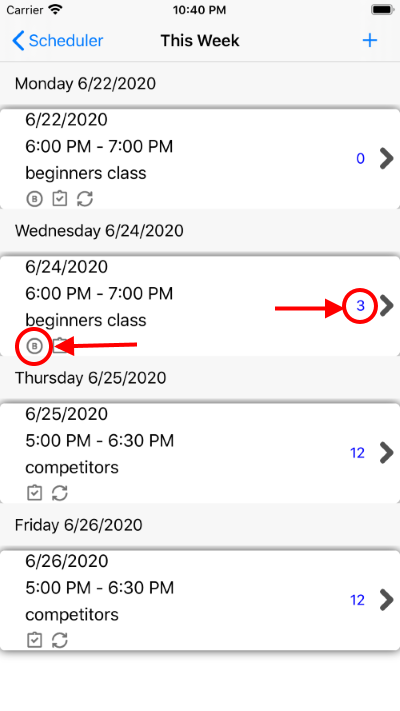
The Dojo Login app for members supports booking and cancellation when the visibility settings above are enabled. The DojoExpert app for instructors currently displays booked members in the "Scheduler"; adding and deleting bookings is planned for future versions. Bookable classes have a small "B" icon, and the counter shows the number of booked members. For classes that do not require booking, it shows the number enrolled. You can also view members by loading the attendance list in the DojoExpert app. Screenshots from both apps:
Payment options
Connect PayPal or Stripe to collect booking fees. Set the price in booking form settings, using the same process as for event registration forms. After booking, students are redirected to a secure payment form. Successful payments automatically create an invoice and record the payment in the student's DojoExpert profile. If a student later cancels a paid booking, the invoice remains in their account. You decide how to handle it, for example by offering another class at no charge or issuing a refund.
Other cool options
Here's a list of other options that you can set in booking forms:
- Send email notifications to students or yourself
- Add fields for students to complete on the booking form using custom fields
- Create discount codes that students can use to get a discount on the booking fee
- Add "merge fields" - include member profile details in the booking list
- Required checkbox - add a checkbox students must select before booking, for example to accept your terms and conditions
- You can make the form available to non-members, but each registrant will be added to your member database. A lead form may be more suitable for collecting prospective member details.
- Show the current number of bookings and, optionally, the names of members who booked. Find this option in form settings.
Limitations
If the same class meets more than once a day, create separate classes for each session. For example, create "morning" and "evening" karate classes, enroll the same members in both, and create a schedule for each.
For individual lessons, create a separate class for each daily time slot. For example, create 6 classes for 6 time slots, each with its own schedule. You can include the time in the class title. If your time slots vary from week to week, create a recurring weekly schedule, then move individual sessions in the scheduler as needed.
Let us know if you need help!