In this short tutorial you will learn a few key points about using the WebShop feature of DojoExpert. You will be able to:
- set up the webshop
- add items to stock
- understand the pricing system
- integrate WebShop into your website
Item visibility and price
The webshop is disabled by default. Before enabling it, add inventory items, select "show in webshop", and enter their prices. Items without prices are not displayed.
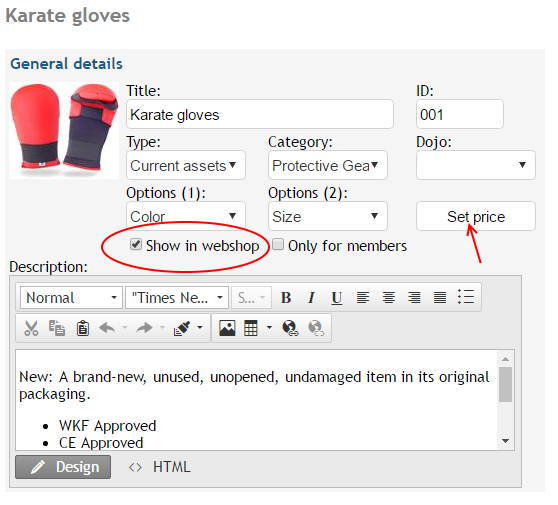
For items with options such as color and size, you can set different prices for different combinations. For example, charge one price for XL karate gloves and another for other sizes, regardless of color:
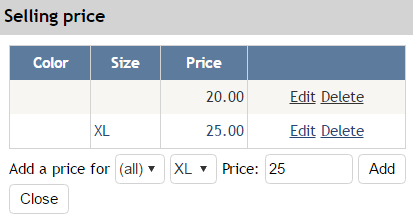
In this example, all sizes cost 20.00 except XL, which costs 25.00. Combinations without a price are unavailable in the webshop. If only S and L have prices, customers can select only those sizes.
Items that are out of stock are not displayed in the webshop.
Adding items to stock
Out-of-stock items are hidden from the webshop and shown in red in the inventory list. Items with one unit remaining are orange; other in-stock items are green. When adding stock, enter the quantity and purchase date. You can optionally enter the purchase price and link an incoming invoice. Recording purchase prices helps you track profit.
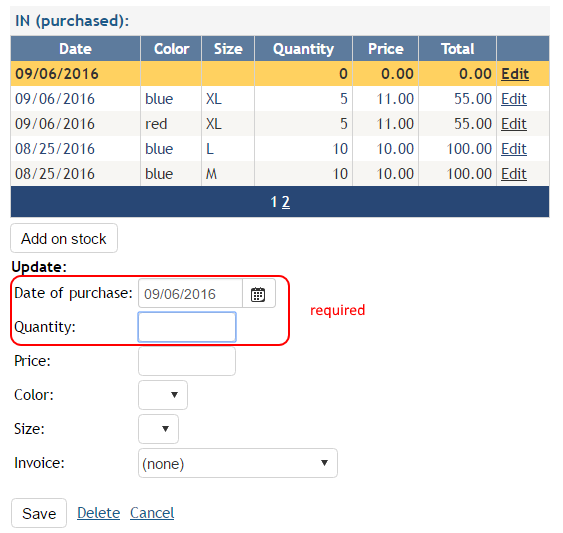
When adding stock, select any item options, such as color and size. Leaving an option blank creates a separate combination, which appears in the stock table. To avoid confusion, always select applicable options. You can edit or delete stock entries later.
Items with no options or more than two options
Each inventory item supports up to two options, each with unlimited values. Items can also have no options, such as a patch for a karate uniform. If you need more than two options, create separate products for the option with the fewest values. For example, create separate WKF-logo and EKF-logo gloves, each with color and size options.
Enabling the webshop
Each dojo (location) can have its own webshop and items, or all locations can share a main webshop. Configure this under "inventory" - "settings":
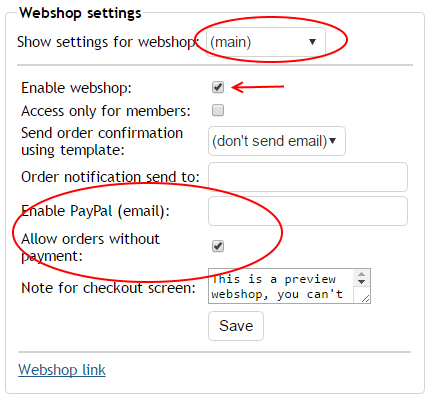
Select a dojo in "show settings for webshop" to view its settings. "Main" includes items from all dojos. Select "enable webshop", then configure payment options. This version supports PayPal: enable PayPal in account settings and enter the email address where you want to receive payments, which can differ from the account settings address. To handle payments yourself, enable "allow orders without payment" instead. You must configure PayPal or allow orders without payment for customers to complete checkout.
The main webshop and each dojo webshop have different links. If you use multiple webshops, share the correct link for each location.
Integrating the webshop into your website
You can use HTML IFRAME to embed the webshop into your site. The code is:
<iframe id="fdews" src="webshop_url" width="600px" height="600px" frameborder="0"></iframe>
Replace the "webshop_url" with your URL and put this code inside the HTML of your website. Ask your webmaster if you need help.